Showing posts with label Arts and Crafts. Show all posts

Wednesday, September 30, 2020

DIY Robot Using Recycled Materials for Math & Science Week Activity

September 30, 2020 0 Comments
DIY Robot Using Recycled Materials for Math & Science Week Activity

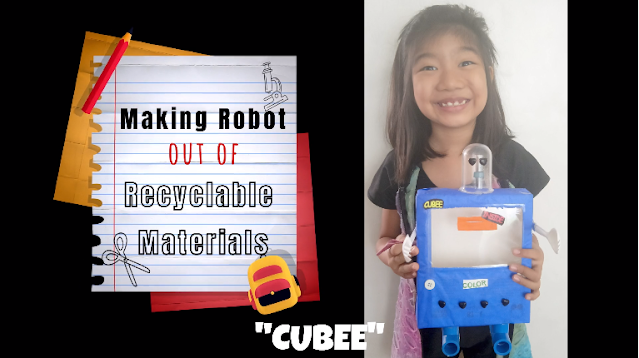
This is the DIY Robot Using Recycled Materials that my 8 year old daughter made for their Math & Science Week Project. She gathered the recycled materials that we have at home and used it to make this DIY Robot. :) 

Here's the short video introduction about her DIY Recycled Robot named Cubee.

The recycled materials used to make this robot are
  1.  Cardboard box 
  2.  Japanese Paper 
  3.  Plastic Caps 
  4.  Pipes 
  5.  Scotch tape 
  6.  Glue 
  7.  Glue gun 
  8.  Buttons 
By the way, you can also use any type of papers or pages from newspapers or magazines to cover the box. :) It's all up to you and your imagination. 

I hope you like this video and comment down below if you have made something like this too.

Tuesday, August 6, 2013

DIY Pom Pom Curtains

August 06, 2013 0 Comments
I am currently addicted to pom poms, specifically yarn pom poms. I just made a DIY Pom Pom Curtains made of yarns in different colors.  I was about to use the pom poms I made for a different project but I got excited and made it all to a curtain. 

I love the fact that my baby loves it, the different colors attracts her. There's just one thing though, she can't resist and grab the pom poms in the window! She would really make ways just to get the pom poms, like climbing in the chair then to her mini table and then to the window... 


Anyways, the process in doing the yarn pom poms is really simple, you just need a lot of patience if you want to make more. There are different kinds of process to make the pom poms and here are the techniques to make it easier for everyone to make it.


This is the process that I did to make my pom poms. First, I made two card-boards in a shape of a circle like the ones on the photo above and started rolling the yarns in it....

Or you can try this step too:

I recently find out a way to make yarn pom poms in bulk! This tutorial could have saved me a lot of time doing the pom poms. Well, there's still a next time because I will be doing more pom poms and make it as a curtain for my daughter's playroom... :)


You can experiment and mix different colors too. Try different colors that would blend and you'll create a colorful pom pom. 

By the way, after you have made your pom poms, you will be needing a thread and a needle. You can use a yarn too or a transparent nylon thread. Measure the length of your window so you'll have an idea on how long would your thread be and then you can now start sewing the pom poms in the middle... :)

This DIY craft is really nice especially on occasions like birthdays, christening or just a decoration in your house or your kids room or playroom. 

There you go, I hope those tutorials had helped you as it has helped me... 'Til next DIY crafts! ;)

Wednesday, July 31, 2013

DIY Charm Bracelet

July 31, 2013 0 Comments
I really want to make my own charm bracelet. I bought different musical charms a year ago because I wanted to make one but unfortunately forgotten all about it. Anyways, my hubby bought me a set of tools that I needed to make jewelries, so I finally decided to continue that overdue project. ;)


Here are the materials you need to create your own DIY Charm Bracelet:
  • Bracelet or Chains (your choice: silver or gold plated)
  • Charms (depends on you, mine were musical charms: guitar, musical notes, microphone and trumpet.
  • Jump rings (used to connect your charms and bracelet or chain).
  • Pliers (used to open and close the jump rings).
It's just easy to make these charm bracelet when you have all the materials ready. All you have to do is connect your charms to the jump rings and from the jump rings, connect it to your bracelet or chain. Here, take a look at the final output... :)

Tuesday, July 23, 2013

DIY Bobby Pins

July 23, 2013 0 Comments
I've been wanting to do this Do It Yourself (DIY) Bobby Pins but I always forgot to buy the materials needed to make one. So, yesterday, I finally had the chance to go out and bought the materials. I saw some cheap buttons in the Mall before and so I went back and bought the good ones. 

I got so excited when I got home. I can't wait to wash it all because most of the buttons where dusty and I don't want to work on dusty things, hehe... Anyways, after I've finished washing them with water and alcohol, I arranged them and started to stick them all with the use of a glue gun.

The process is really really simple! Put your desired buttons on the bobby pins  and clips then stick it with a glue gun. Wait for a few minutes and it's all done! :)

And here's the results:


Aren't they cute? I ran out of buttons so I might check out for more next time when we go out... :) Those two clips with the wobbly eyes aren't button, I just tried to put it on those cutie circles I found here at home and it turned out cute... ;) My little one liked it too, the blue one looked like cookie monster, she kept on saying 'cookie mommy'... :)